How to Record Audio in ShareX?
Recording audio doesn’t have to be a complicated process, especially when you have the right tool at your disposal. That’s where ShareX comes into play. As a powerful screen capture and file-sharing tool, ShareX also offers a user-friendly solution for recording audio, making it an indispensable utility for content creators, podcasters, and anyone who needs to capture audio for personal or professional purposes.
In this article, I will walk you through the step-by-step process of recording audio in ShareX, both with and without video. Whether you’re looking to capture audio-only files or combine audio with video recordings, this article has got you covered. By the end, you’ll have a solid understanding of how to leverage ShareX’s audio recording capabilities to produce high-quality recordings effortlessly.
Steps for Recording Audio Only in ShareX
Sometimes, you may only need to capture audio without any video component. ShareX makes this process incredibly simple and straightforward. Instead of recording the screen, you’ll be capturing audio from your chosen source, such as a microphone or system audio. This can be useful for podcasts, voice-overs, or any other audio-only projects.
- Open ShareX on your PC or Laptop.
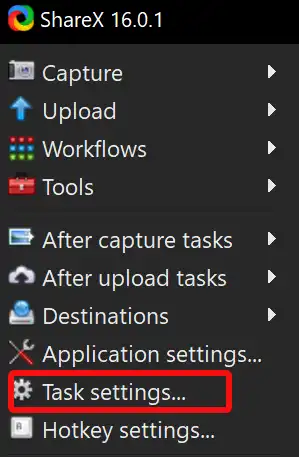
- Once ShareX is open, look for the Task settings section on the left sidebar and click on it.
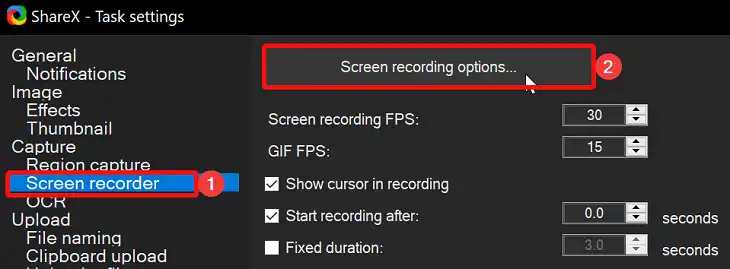
- In the Task settings window, under the Capture section, click on Screen Recorder and then click on Screen Recording Options.
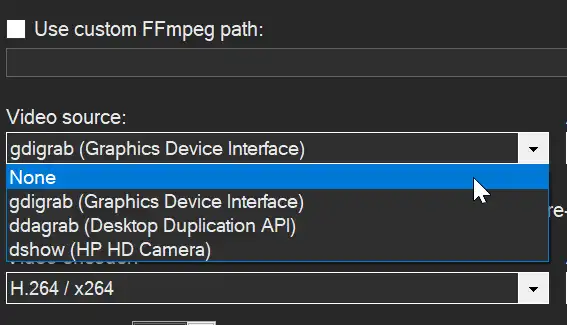
- A new window titled Screen recording options will appear. In this window, locate the Video source dropdown menu and select None. This will ensure that you’re capturing audio without any video.
- Next, under the Audio source section, choose the desired audio source you want to record from. This could be your microphone, system audio, or any other available audio input device.

- After configuring the settings, it’s time to start recording. ShareX has a handy recording shortcut, which is Shift+Print Screen by default. Press this shortcut to initiate the audio recording.
- Depending on your settings, you may be prompted to choose the audio source you want to record. If so, simply select the desired option and proceed.
- Once the recording has started, you can begin speaking or playing the audio you want to capture.
- When you’re done recording, press the same shortcut (Shift+Print Screen) again to stop the recording.
ShareX will save the audio recording as a separate file, ready for you to use or share as needed.
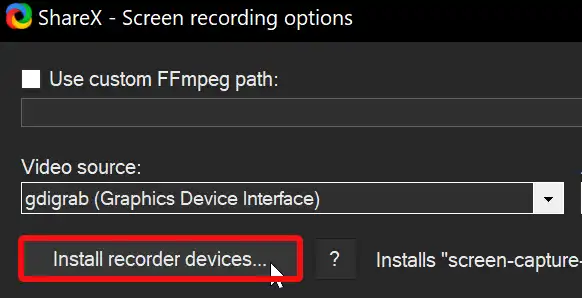
Note – if you are doing it for the first time then you will need to install the recorder devices. You will find it in the Screen recording options.
Steps for Recording Audio Along with Video in ShareX
In many situations, you may want to capture both audio and video simultaneously. ShareX offers a seamless way to achieve this. Whether you’re creating a tutorial, recording a gameplay session, or capturing a video call, combining audio and video can provide a more immersive and comprehensive experience.
- Start by opening ShareX and navigating to Task settings > Screen Recorder > Screen recording options, just like in the previous method.
- In the Screen recording options window, locate the Sources section. Here, you’ll find dropdown menus for selecting various input sources, including audio and video.
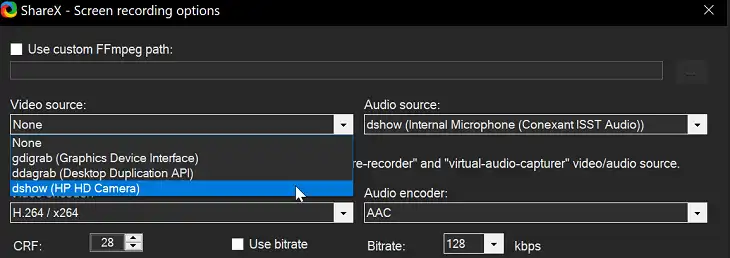
- Under the Video Source dropdown menu, choose your desired Video Source. This will be the audio source that will be recorded along with the video.
- Once you’ve selected the video source, it’s time to start recording. Use the recording shortcut (Shift+Print Screen by default) to initiate the recording process.
- You’ll be prompted to select the screen area you want to capture. Use your mouse cursor to drag and select the desired area.
- After selecting the area, ShareX will begin recording both the video and audio components simultaneously.
- When you’re done recording, press the same shortcut (Shift+Print Screen) again to stop the recording.
ShareX will save the recorded file, combining both the video and audio components seamlessly.
FAQ
Can I record audio from multiple sources simultaneously in ShareX?
Yes, ShareX allows you to record audio from multiple sources at the same time. This feature can be incredibly useful if you need to capture different audio streams simultaneously. For example, you might want to record your microphone audio along with system audio for a gaming video or livestream.
How can I adjust the audio quality in ShareX?
In the “Screen recording options” window, you can find settings related to audio quality under the “Output” section. Here, you can modify settings such as the audio codec, bitrate, and sample rate to suit your preferences. For example, increasing the bitrate will generally result in higher audio quality but also larger file sizes.
Conclusion
Recording audio with ShareX is a seamless and rewarding experience, thanks to its intuitive interface and powerful features. Whether you need to capture audio-only files or combine audio with video recordings, ShareX provides a versatile solution that caters to your specific needs.


