ShareX Scrolling Screenshot – How to Roll with ShareX?
ShareX is one of the popular free source programs that allow you to capture or record any area of your screen. By using ShareX, you can take any kind of screenshots you want and scrolling screenshots is one of them! If you are using ShareX for the very first time and willing to capture scrolling screenshots then this article can help you out!
In this article, I’ve provided step by step guide which can lead you to take scrolling screenshots with ease. So, without any further ado, let’s begin then!

Mechanism of Scrolling Screenshot of ShareX
ShareX employs a clever and efficient approach to capture scrolling screenshots seamlessly. The process begins by taking an initial screenshot of the visible portion of the webpage or document you wish to capture. This initial capture serves as the foundation for the scrolling screenshot.
As you might expect, the content you want to capture often extends beyond the initial visible area. To address this, ShareX implements a comparative analysis technique. It takes subsequent screenshots of the webpage or document as it scrolls down, and compares each new capture with the previous one.
If ShareX detects any changes or new content in the subsequent screenshot, it performs a precise cut and append operation. The top portion of the new screenshot, which overlaps with the previous capture, is discarded. Then, the remaining bottom part containing the new content is seamlessly appended to the end of the previous screenshot.
This intelligent process continues iteratively, with ShareX constantly evaluating each new screenshot against the previous one. Whenever new content is identified, it is appended to the existing capture, effectively stitching together the individual screenshots into a single, cohesive scrolling image.
The process continues until ShareX has successfully captured the entire webpage or document, ensuring that no part of the content is missed or left out. This ingenious mechanism allows ShareX to effortlessly capture scrolling content of any length, providing you with a comprehensive and high-quality scrolling screenshot.
Steps to Follow to Capture Scrolling Screenshot in ShareX
For a smooth and hassle-free scrolling screenshot experience with ShareX, keep these handy tips in mind. Optimize your captures, avoid common pitfalls, and make the most of ShareX’s scrolling screenshot capabilities with these valuable insights.
Step 1 – First, Go to the Page or Window Where You Want to Take a Scrolling Screenshot
Open the web page, document, or application window that you want to capture in its entirety. This could be a lengthy blog post, a tutorial, or any other content that requires scrolling to view in full.
Step 2 – Open Icon Tray
Next, locate the ShareX icon in your system tray (usually in the bottom-right corner of your screen). If you can’t find it, you can also access ShareX from the start menu or by using the keyboard shortcut (the default is Ctrl + Print Screen).
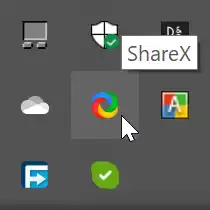
Step 3 – Right-click on ShareX and Choose Scrolling Capture
Right-click on the ShareX icon in the system tray and select the Scrolling Capture option from the context menu. This will activate the scrolling screenshot mode.
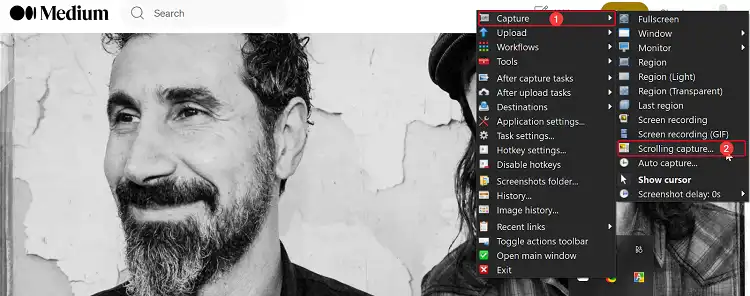
Step 4 – Start Selecting the Region and Wait till the Scrolling is Done
After selecting Scrolling Capture, your cursor will change to a crosshair. Use your mouse to select the region you want to capture by clicking and dragging. ShareX will automatically scroll through the content and stitch the individual screenshots together into a single, scrolling image.
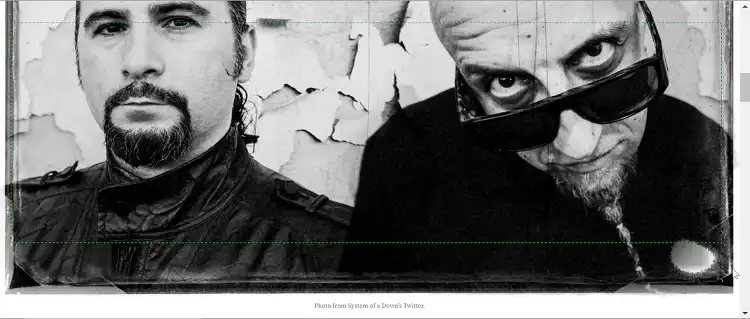
Once you’ve selected the desired region, sit back and let ShareX work its magic. The scrolling capture process may take a few moments, depending on the length of the content and your system’s performance.

Tips for Capturing Scrolling Screenshots in ShareX
For a smooth and hassle-free scrolling screenshot experience with ShareX, keep these handy tips in mind. Optimize your captures, avoid common pitfalls, and make the most of ShareX’s scrolling screenshot capabilities with these valuable insights.
- Avoid hovering your mouse cursor over the screen while capturing, as it can inadvertently trigger visual changes like highlight effects or background color shifts, leading to inconsistent or inaccurate captures.
- When capturing content with static or animated elements, utilize ShareX’s custom region selection feature. Simply hold down the left mouse button and drag to outline the specific area you wish to capture, excluding any unwanted static or moving components.
- If you encounter any issues or unexpected behavior during the scrolling capture process, try adjusting ShareX’s settings or refer to the comprehensive documentation or online community for troubleshooting guidance.
- Experiment with different capture methods and settings to find the optimal configuration that suits your needs and workflow. ShareX offers a range of customization options, allowing you to tailor the scrolling screenshot experience to your preferences.
By keeping these tips in mind and exploring ShareX’s features, you’ll be able to capture scrolling screenshots like a pro, ensuring accurate, consistent, and high-quality results every time.
Wrapping Up
Alright, that’s all about capturing scrolling screenshots with ShareX! By now, you should be a scrolling screenshot pro. Remember, the more you use ShareX, the better you’ll get at customizing captures for your needs. If you ever get stuck or have any questions, feel free to leave a comment below. The tech world is full of helpful folks who are always happy to lend a hand. Happy capturing!

