OBS Virtual Camera Not Showing Up in Chrome
You want to use the OBS virtual camera feature within Google Chrome, but the virtual camera option does not appear in the list of available cameras. This can be frustrating, especially when you need to use the virtual camera for live streaming, video conferencing, or recording purposes. Fortunately, there are several solutions to fix this issue.
In this article, we’ll explore why the OBS virtual camera might not be showing up in Chrome and provide step-by-step instructions to resolve the problem.
Why OBS Virtual Camera Is Not Showing Up in Chrome?
The OBS virtual camera not appearing in Chrome can be caused by various reasons. Here are some common culprits explained in detail –
OBS Virtual Camera Not Activated: Before proceeding with any troubleshooting steps, ensure that the virtual camera is turned on within OBS. Go to “Tools” > “Virtual Camera” in the OBS menu. If the option is greyed out, it means the virtual camera is not activated. Click on the “Start” button to activate it. The virtual camera should now be enabled and visible within OBS.
Chrome Hardware Acceleration Conflict: Chrome’s hardware acceleration feature utilizes your computer’s graphics processing unit (GPU) to enhance performance by offloading some graphics rendering tasks from the CPU. However, this feature can sometimes conflict with virtual cameras like the one provided by OBS. The hardware acceleration feature may interfere with the way virtual cameras capture and transmit video data, causing them to not show up in Chrome.
Some users have reported that disabling the “Use software rendering instead of GPU rendering” option in Chrome’s settings can also help resolve the virtual camera issue. This option forces Chrome to use CPU-based rendering instead of GPU acceleration, which may be more compatible with virtual cameras.
Conflicting Default Camera: Most operating systems have a default camera setting that applications will use unless specified otherwise. Chrome might prioritize a default system camera (e.g., a built-in webcam or an external USB camera) over the virtual camera provided by OBS. If a physical webcam is connected to your computer, Chrome may automatically select it as the default camera, preventing the OBS virtual camera from appearing in the list of available cameras.
In some cases, users have reported that disabling the default system camera or removing the webcam driver can help resolve the issue and force Chrome to recognize the OBS virtual camera.
How to Solve the “OBS Virtual Camera Not Showing Up in Chrome” Issue?
Resolving the issue of the OBS virtual camera not showing up in Chrome can be achieved through a series of troubleshooting steps. These steps range from basic checks and configurations to more advanced solutions like disabling hardware acceleration or addressing conflicting default camera settings.
Set Up in OBS
First, you need to ensure that the OBS virtual camera is set up correctly within OBS –
Step 1: Click on the “Sources” section in OBS.
Step 2: Click on the “+” button to add a new source.
Step 3: Select “Video Capture Device” from the list of source types.
Step 4: Create a new source by clicking “OK”.
Step 5: In the device dropdown menu, select “OBS Virtual Camera”.
Step 6: Click “OK” to confirm and add the virtual camera as a source.
Make sure the OBS virtual camera is installed correctly and recognized by OBS in the first place. If it works in OBS, you can start the camera output in OBS, and if you can feed the virtual camera right back into OBS as a capture device source (just to make sure it works), you should be able to use it in other apps as well.
The OBS webcam plugin comes with an installer. Also, you need to turn on the camera in the Tools menu. After the virtual camera is installed, it needs to be turned on. Go to the Tools menu in OBS, and click on “Virtual Camera”. OBS sees it as an output when it is on and will block the ability to edit some settings, so you’ll need to be able to turn it off and on.
Configure Google Chrome
Once the OBS virtual camera is set up and working within OBS, you can configure it to be used in Google Chrome –
Step 1: Open Google Chrome.
Step 2: Click on the three dots in the top-right corner to open the menu.
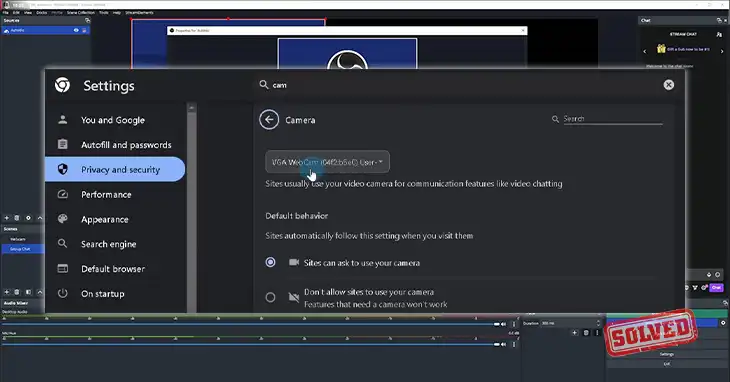
Step 3: Go to “Settings”.
Step 4: Use the search bar to search for “camera”.
Step 5: Click on the “Site settings” result.
Step 6: Click on “Camera”.
Step 7: From the dropdown menu, select “OBS Virtual Camera”.
Additionally, you can enable the “Camera Preview” flag in Chrome to see a preview of the virtual camera before allowing access. To do this –
Step 1: Open chrome://flags in the address bar.
Step 2: Search for “Camera Preview” and enable the flag.
Step 3: Restart Chrome.
When a site asks to allow camera access, the camera preview will be shown. Cross the first camera preview (which will be the default camera), and the second camera preview will be the OBS virtual camera. Allow access to the OBS virtual camera.
If the basic checks and configurations don’t work, let’s focus on the hardware acceleration conflict.
Disable hardware acceleration in Chrome
- Open Chrome, click on the three dots in the top-right corner, and select “Settings.”
- Scroll down and click on “Advanced” to expand the advanced settings section.
- Under the “System” section, toggle the “Use hardware acceleration when available” option to off by clicking on the switch.
Check if the OBS virtual camera is now available in Chrome
After disabling hardware acceleration, try accessing a website or application that requires a camera. You can test this by going to a site like webcamtests or by trying to start a video call on a platform like Google Meet. If the OBS virtual camera appears in the list of available cameras, you’ve resolved the issue.
However, disabling hardware acceleration may impact Chrome’s performance, so you might want to search for solutions that allow you to enable hardware acceleration while still using the virtual camera.
If the issue persists, you can try advanced troubleshooting –
Disable the “Use software rendering instead of GPU rendering” option in Chrome
Some users have reported that disabling this option in Chrome’s settings can help resolve the virtual camera issue. To do this, open Chrome, type chrome://flags in the address bar, and search for the “Use software rendering instead of GPU rendering” flag. Disable this flag and restart Chrome.
Disable The Physical System Camera
If you have a physical webcam connected to your computer, try disabling it temporarily to isolate the issue. This step should be considered a last resort, as it may cause other applications relying on the physical camera to malfunction.
The process for disabling a webcam varies depending on your operating system, but generally involves going to your system’s device management settings and disabling or uninstalling the webcam device driver.
On Windows:
- Open the Device Manager (search for “Device Manager” in the Start menu)
- Expand the “Imaging devices” section, right-click on your webcam device
- Select “Disable device.”
On macOS:
- Open the Apple menu,
- Select “System Preferences”
- Click on “Security & Privacy” then the “Privacy” tab.
- Select “Camera” from the left pane, and deselect the checkbox next to your webcam device.
On Linux: The process varies depending on your distribution, but it typically involves using the system settings or a command-line tool to disable or unload the webcam driver module.
Bonus Tips
- Ensure you’re using the latest version of OBS. Visit the OBS website and download the latest version of the software for your operating system. After installing the update, try using the virtual camera again.
- Check for OBS plugin conflicts. Some third-party plugins or scripts installed in OBS can potentially interfere with the virtual camera functionality. Try disabling or removing any non-essential plugins and check if the virtual camera works without them.
Conclusion
Troubleshooting the “OBS Virtual Camera Not Showing Up in Chrome” issue can be a straightforward process, but it may require patience and persistence. Start by ensuring that the OBS virtual camera is set up correctly within OBS and recognized by the software. Then, configure Chrome to use the OBS virtual camera and enable the “Camera Preview” flag for easier access. If the issue persists, try disabling Chrome’s hardware acceleration, disabling the “Use software rendering instead of GPU rendering” option, or consulting OBS forums and communities for more advanced solutions.
Frequently Asked Questions
Can I use the OBS virtual camera with other browsers besides Chrome?
Yes, the OBS virtual camera should work with most modern web browsers, including Firefox, Edge, and Safari. However, the specific troubleshooting steps may vary depending on your browser. For example, in Firefox, you should navigate to about:config and change the media.video_loopback_cam setting to enable virtual camera support.
Can I use the OBS virtual camera with other applications besides web browsers?
Absolutely! The OBS virtual camera can be used with various applications that support webcam input, such as video conferencing software (e.g., Zoom, Skype, Microsoft Teams), video editors, and even some games. However, keep in mind that some applications may have settings or preferences that need to be adjusted to recognize and use the OBS virtual camera.

